In this article
Email Backend Service Settings
Open a web browser and go to <host/ip>/webmonitor_deploy. Start by registering a new account on the monitor with the user name monitoradmin.
Note: Select a password and make sure to remember it or write it down, because the password is not recoverable.
The monitoradmin user is automatically made an administrator that can add other users and configure the web monitor.
The Web Monitor link/URL is: <host/ip>/webmonitor_deploy
-
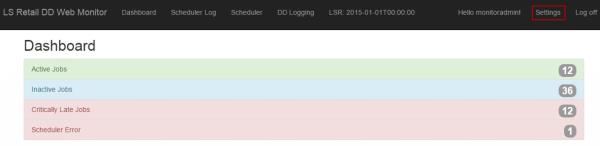
Click the Settings button in the top-right corner to configure the Web Monitor.
The configuration settings contain settings for the monitoring database, timing for late and inactive jobs, and email setup. The user has to click the Save button to save the changes made.
Note: If the user is changing a settings category that requires a password, the password must be entered again.
Database Settings
The Database Settings tab contains settings for the database where the monitoring data is collected by the Data Director. These settings are required for the monitor to work correctly. The database that is monitored is the database that the Data Director Monitor collects information from.

The fields in the Database Settings tab are:
| Field | Description |
|---|---|
| Monitoring Server Address | The DB server address where the data is collected |
| Monitoring Database | The database where data is collected |
| Monitor Line Table | “<company name>$DDMonitorLine” (for LS Central 17.5 and later use LSC prefix in front of table name) |
| Monitor Header Table | “<company name>$DDMonitorHdr” (for LS Central 17.5 and later use LSC prefix in front of table name) |
| Scheduler Log Table | “<company name>$DDSchLog” (for LS Central 17.5 and later use LSC prefix in front of table name) |
| Scheduler Table | “<company name>$DDScheduler” (for LS Central 17.5 and later use LSC prefix in front of table name) |
| Username for monitoring database | SQL user login that has access to the monitoring database |
| Password for monitoring database | Password for the SQL user that has access to the monitoring database. User has to enter the password when database settings are changed |
Timing Settings
Timing Settings let the user define when a job is late. A user can set how late a job can be before warnings are triggered.
There are two types of warnings, a Warning and a Critical Warning.
The user can also define how late a critical job can be before an error is triggered. Critical jobs are defined in the Critical Settings tab.
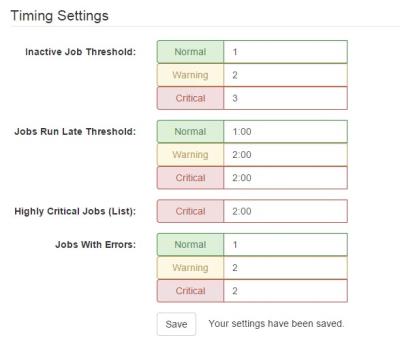
Fields in the Timing Settings tab:
| Field | Description |
|---|---|
| Inactive Job Threshold | Has not been implemented yet. |
| Jobs Run Late Threshold | How late a job can be before a warning or critical error is triggered. The line in Scheduler becomes yellow/red and a warning or error will be sent if email settings have been configured. |
| Highly Critical Jobs | Jobs that are defined to have a shorter error threshold. |
| Jobs with errors | Has not been implemented yet. |
Email Settings
In Email Settings a user can enter email addresses that will get emails when errors occur. The user can enter multiple email addresses in each error category. It is necessary to fill out Email Backend Service Settings to enable email sending.
Email Backend Service Settings
SMTP settings are configured in the Email Backend Service Settings tab to enable email sending.
Critical Settings
The user can enter jobs that are critical and those jobs will be marked Critical Jobs in the Web Monitor. Critical jobs have their own time threshold, which is defined in Timing Settings.
Note: When the monitor has been configured, the LS Retail Monitor background service needs to be restarted.